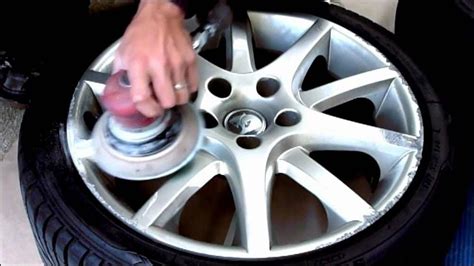
How To Refurbish Aluminum Wheels
Ronan Farrow
Apr 02, 2025 · 3 min read

Table of Contents
How to Refurbish Aluminum Wheels: A DIY Guide to Sparkling Rims
Are your aluminum wheels looking a little worse for wear? Scratches, curb rash, and faded paint can significantly detract from your car's appearance. Fortunately, refurbishing your aluminum wheels is a doable project, even for DIY enthusiasts. This comprehensive guide will walk you through the process, saving you money and giving your car a fresh, clean look. We'll cover everything from preparation to the final polishing, ensuring your wheels gleam like new.
Assessing Your Wheels and Gathering Supplies
Before you begin, carefully inspect your wheels for damage. Determine the extent of the scratches, curb rash, and fading. This will help you decide on the necessary steps and supplies. You'll need:
Essential Supplies:
- Wheel cleaner: Specifically designed for aluminum wheels to avoid damaging the finish.
- Degreaser: Removes stubborn grime and brake dust.
- Wire brush (various sizes): For cleaning stubborn dirt and corrosion in tight spaces.
- Sandpaper (various grits): Starting with coarser grits (like 120) to remove deeper scratches, then progressively finer grits (like 220, 320, and 400) for smoothing. Consider using wet sanding for better control.
- Masking tape and paper: To protect areas you don't want to sand or paint.
- Aluminum primer: Provides a smooth, even base for the paint.
- Automotive paint (matching your wheels): Choose high-quality paint designed for wheels to withstand the harsh conditions.
- Clear coat: Protects the paint and provides a glossy finish.
- Paint sprayer (optional but recommended): For an even and professional-looking finish. A quality spray can will also work.
- Microfiber cloths: For cleaning and polishing.
- Polishing compound and wax: For a final, high-gloss shine.
- Gloves and safety glasses: Protect yourself from chemicals and flying debris.
- Wheel weights: Remember to reinstall your wheel weights after refurbishment.
Step-by-Step Refurbishment Process
This process involves several key steps:
1. Thorough Cleaning:
- Remove the wheels: Carefully remove your wheels from your car, ensuring the parking brake is engaged.
- Clean thoroughly: Use a wheel cleaner and degreaser to remove all dirt, brake dust, and grime. Pay close attention to crevices.
- Inspect for damage: Once clean and dry, carefully inspect your wheels again to assess the extent of damage.
2. Repairing Damage:
- Sanding: Use sandpaper of varying grits to carefully smooth out scratches and curb rash. Start with coarser grits and work your way up to finer grits. Remember to sand evenly to prevent uneven surfaces. Wet sanding is crucial here.
- Repairing deep gouges: For more severe damage, consider using a specialized wheel repair kit or seeking professional assistance.
3. Priming and Painting:
- Masking: Use masking tape and paper to protect areas that shouldn't be painted.
- Priming: Apply several thin coats of aluminum primer, allowing each coat to dry completely. This creates a uniform surface for the paint to adhere to.
- Painting: Apply several thin coats of automotive paint, ensuring even coverage. Use a spray gun or high-quality spray can for optimal results. Let each coat dry thoroughly.
- Clear coat application: Finish with several thin coats of clear coat to protect your paint and give it a glossy finish.
4. Final Polishing:
- Allow to dry: Let the paint and clear coat cure completely as per the manufacturer's instructions.
- Polishing: Use a polishing compound and microfiber cloth to remove any imperfections and achieve a high-gloss finish.
- Waxing: Apply a good quality wax for added protection and shine.
5. Reinstallation:
- Reinstall wheel weights: Carefully reinstall your original wheel weights or replace them with new ones, ensuring proper balancing.
- Mount wheels: Mount your freshly refurbished wheels back onto your car.
Tips for Success
- Patience is key: Take your time and be meticulous throughout the process. Rushing can lead to mistakes.
- Proper ventilation: Work in a well-ventilated area when using solvents and paints.
- Cleanliness is crucial: Keep your workspace clean to prevent dust and debris from contaminating the paint.
- Practice: Consider practicing on a scrap piece of metal before working on your actual wheels.
By following these steps, you can successfully refurbish your aluminum wheels, giving your car a dramatic upgrade at a fraction of the cost of professional refurbishment. Remember safety first! Use appropriate protective gear throughout the process.
Featured Posts
Also read the following articles
| Article Title | Date |
|---|---|
| How To Roast Hatch Chile Peppers In The Oven | Apr 02, 2025 |
| How To Rent Apartment Without Job | Apr 02, 2025 |
| How To Split Water Lilies | Apr 02, 2025 |
| How To Transport Outboard Motor | Apr 02, 2025 |
| How To Remove Domestic Violence Charges From Record | Apr 02, 2025 |
Latest Posts
-
How Fast Does A 90 Hp Pontoon Boat Go
Apr 04, 2025
-
How Fast Does A 400ex Go
Apr 04, 2025
-
How Fast Does A 36v Golf Cart Go
Apr 04, 2025
-
How Fast Does A 36 Volt Golf Cart Go
Apr 04, 2025
-
How Fast Do Red Root Floaters Grow
Apr 04, 2025
Thank you for visiting our website which covers about How To Refurbish Aluminum Wheels . We hope the information provided has been useful to you. Feel free to contact us if you have any questions or need further assistance. See you next time and don't miss to bookmark.
